Showing posts with label storage. Show all posts

Monday, August 19, 2013

Monday Musebles: Cleaning and Organizing


Some people (ahem...Mike...) might say I'm rather messy. I personally wouldn't consider it messy, maybe just a little cluttered. Or maybe an organized mess (does that fit into the same category as a functional alcoholic?). Anyway, I've been waiting a while to get all my craft stuff organized. I had to find the right furniture, then sell my desk and buffet table - both of which sold on Craigslist in less than three weeks!


I found these new storage pieces at Garden Ridge in Chesapeake. Unfortunately they were too short for my existing bins so I had to buy all new ones. Wasn't too upset though, it gave me a chance to go through all my supplies and purge a little. I have space for all my felt food packaging in one place, along with organizing all my packaging and shipping labels. Guess that means Fairview Place (via Etsy) is open for business again!


This plant stand I bought when I first moved here at an antique store out on Granby Street. I had actually left the store and drove halfway home, only to turn around and go back and get this! It was $14! I used it for all my shoes (with canvas bins), but now use it for my buttons and packaging station.


Mike's dresser is still in need of its makeover. I had this in mind, but since almost everything in our house has some sort of distressed look to it, I'm thinking about going NORMAL. Maybe this or this. I'm using this piece for all my paper/sticker/stationery/paper parcels materials and for the finished products.

I also got the pillows (#86) made for the guest bed, I have to say I'm pretty obsessed
with the patterns (even if Mike thinks the blue pillow is actually Batman material)


I typically don't use a lot of ribbon, but this year I plan on making a whole slew of the holly-day brooches. This ribbon (plus what I have in storage) will come in handy then and so will this dispenser made from a wine rack and dial rods. I'm feeling pretty satisfied that I can finally cross off #64: Clean and #43: Organize.


I'm participating in the 92 Days of Summer challenge. To learn more about it, click here.

Thursday, August 1, 2013

Thrifty Thursday


My Mom is no stranger to me bringing home other people's trash. One time in high school I drove to return a movie to the video store (sounds so primitive) and spotted a rather large mirror next to someone's trash. The mirror weighed more than I did, but it followed me around through college and even to Virginia. When my parents were visiting and we passed this dresser my Stepdad says "Doing some shopping, Ashley?" I had already eyed this gem and was just thinking of the right way to persuade Mike to let me bring it home.


It's Vintage! It's Free! It's on our street, so it has to mean it was meant for me! I know we don't need it, but what's the harm in taking something that will be heading to a landfill? Lucky for me, there was a garage sale that my Mom and I walked to, so we detoured to the dresser. As we approached I spotted another girl leaning over the rather sad-looking piece. It wasn't until this moment I knew I needed to have it. Turns out, she was taking the hardware off the drawers. (By the way, who does that? That's like eating all the free samples and then not buying anything!) Regardless, my Mom and I walked over to check out the leftovers. The dresser was falling apart. It would have to be completely refinished, if not halfway rebuilt. After inspecting the drawers, I decided a few of them would be usable for shadow boxes. So yeah, I took two drawers. I'm not sure what's worse, taking the hardware or just taking two drawers.

Top shelf shows my new bluebird (Michael's clearance for $2) and my Grandmother's milkglass
vase. The bottom shelf holds a clock my Great Uncle Vernon made, owls my sister bought me
from Burma, a random glass vase and a hand-stitched floral picture by my Great Aunt Alice.

Nevertheless, I came home, applied some wood glue, gave the boxes several coats of white paint and purchased three spigots, bolts and nuts (a total of $6.36). Mike attached some hangers to the back of the boxes and we hung them in the guest bedroom. Not too bad for something that was heading to a landfill!


Wednesday, May 9, 2012

Digital Inspiration Board

Since I'm home an unable to post my typical monthly inspiration board, I  decided to make a digital board of small home offices...in hopes of finishing up the organization and redesigning of my office/kitchen.

(click for original web site) Pinterest, Apartment Therapy, Better Homes and Gardens, Health and the BLT Boys

I can't get enough of these closet offices! The teal office is a little a little much, but it makes great use of the small space. I love the forest wallpaper from BH&G, although I would need a bit more storage space than three shelves. The BLT Boys storage would be perfect, but just a tad more desk space would be ideal.

The Wren Design

Decorating clipboards with contact paper, maybe the new inspiration board? The bright orange lamp is also delightful.


Apartment Therapy, Better Homes and Gardens

I really like the idea of working from a high chair, it gives you plenty of "under the desk" storage or making use of a bookshelf for legs of the desk. Both offer tons of light (not an option in my office space) and nice storage.


The Inspired Room

The walls around my grandpa's workbench were covered in pegboard and I thought it was always a little ugly...but throw some paint on it and lots of pegs for crafting goodies and it's artwork in itself. The board is inexpensive and pretty lightweight, so it won't be nuisance to buy or hang.


Shades of Light
I think I'll dye my old Ikea rug instead of buying new, the yellow color is amazing! Stay tuned for photos of the updated office later this month!

Thursday, April 19, 2012

Thrifty Thursday


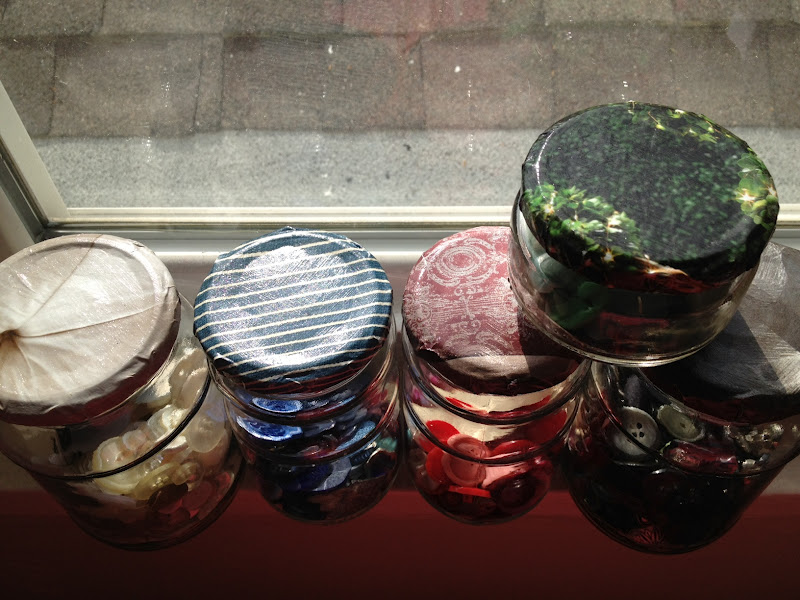
I decided that to make my button jewelry process easier, I needed to have color coordinated jars for my buttons. You might think this is a little excessive, and you're right. However, it took me about 15 seconds to find a particular button the other day, where as it used to take me months (yes, months) to locate the necessary item ;)

You'll notice fabric on the left, which I was originally going to use.
However, after trying one or two lids, I realized they wouldn't
close tight and resorted to magazines instead.

The project can be made with any old jars and paper, the Mod Podge will cost you less than $5 at the craft store and the project will take you less than 40 minutes!

What you need:
5-7 jars, cleaned free of labels and glue
Mod Podge
Foam paint brush
Scissors
Magazines – Restoration Hardware came in handy for this!

What you do:
1. Cut your colored paper in circles measuring about 1" wider than the lids.
2. With the foam brush, apply the Mod Podge to the wrong side of the circle (apply generously). Lay the lid in the center of the circle and fold the edges to the inside of the lid.
3. Apply another generous coat of Mod Podge to the top of the lid and sides. You can repeat this a couple of times for a more textured finish ( I put two coats on).