

Monday, April 30, 2012
New Sponsorship!
Music Mondays
.JPG)
A photo and playlist from our New Orleans trip. We heard the Lagniappe Brass Band (pic above) one night and I immediately bought the cd, so a few from them and others we heard. Enjoy!
Wednesday, April 25, 2012
Vacation begins now!
.JPG)
I'll be taking a few days off from blogging due to a vacation with the boy to New Orleans! Don't worry, I'll be sure to post lots of pics and stories next week when we return :)
Tuesday, April 24, 2012
DIY Baby Shower Bouquet

This was really my whole inspiration for the shower. I saw a segment on Martha Stewart about making one of these and instantly put it on the list. Of course Martha makes it look so much easier, but after some trial and error I figured out what worked best for me and I'm pretty happy with the results.

What's really important is how they look from the top, if the floral tape gets a little funky at the bottom or the stems don't stick perfectly straight into the styrofoam - don't fret! You won't actually see any of that when you're finished!
What you need:
Random baby clothes, I used: 5 onsies, 8 baby washcloths, 2 pairs of mittens, 2 pairs of socks, a sun hat, and a burp clothFloral tape
Floral wire (the thicker the better)
Terra cotta pot (decorated, if you desire)
Styrofoam
Fake foliage, tissue paper (optional, helps fill in the gaps)
What you do:

1. Making each "flower" is a different process and really comes down to what you think looks nice. The onsies are the easiest to start with; fold in the sleeves and the butt making a rectangle. Roll into a long tube.

2. To create the "stem," loop the wire around the center of the tube wrap the wire a few times. Fold the tube in half and start wrapping the floral tape half way down the flower until you reach the wire. It takes a little practice to use the tape (as you wrap, pull the tape tight and it gets sticky). I still had to use a dab of glue stick to get the tape end to stick, which won't effect the clothes.

3. Repeat with all your baby clothes. I used some neon green ribbon with some of the flowers that were a little bland. You could add mini flowers, leaves, beads, whatever floats your boat.

4. Next, cut the Styrofoam to fit into your pot. I layered it twice, since the flowers are so top-heavy.

5. Alternate sticking in the flowers with the foliage. It make take a little rearranging to get it right.
DIY Shower Favors

It seems a little odd to have flowers as a theme for a boy baby shower, but the mom is a girl and she likes flowers...and for the next million years it's going to be all about the boy...so why not something pretty? Plus, when you see the centerpiece (next post), it'll all make sense.

These were probably the easiest and relatively cheapest favors. I bought the terra cotta pots ($10.50 for 11 of them at Michaels) and Deb and I sponge painted them with some of her left over paint. The flowers were $1.15 for a six pack at Home Depot and I bought Marigolds, Petunias and Lamb's Ear.


DIY Baby Shower Invites
The invites were so simple and could be used for any event. I had coupons for both the envelopes and cardstock so the invites, direction cards and menu cards cost about $6 to make (made a total of 14 each).

What you need:
6"x6" cardstock pad - 24 sheets (with patterns on the back and front)
photo paper, various card stock
glue stick
envelopes

What you do (invites):
1. Cut the base of the invite to be 4.5"x6". Cut 1"x6" strips from the scraps. Coordinate your strips with your invite base so the colors pop against one another. Glue together.
2. I designed the center part of the invite with three different fonts, and colors I pulled from the cardstock. I printed them on photo paper and glue it to the cardstock. Slip inside the envelope with a direction card (if needed) and send away!


What you do (menu cards):
We decided to have a set menu for lunch to make it easier on the kitchen staff. We picked three lunch options. I used the design from the invite to create the menu. Printed it, glued it onto the random colored cardstock I already had. I added the color strips and circles to the cards to tie it all in.
DIY Baby Shower

On Saturday I helped to host a baby shower for Kelly Jo. We decided to go super simple and have it at the new Surf Rider at the Poquoson marina. The food was delicious and with a few simple DIY projects the shower turned out just lovely. Plus, we left out the baby games and kept it right about 2 hours :)
I have a full day of DIYs to make your shower cute, inexpensive and a breeze, stay tuned!
Monday, April 23, 2012
Music Mondays
 |
| Photo from last year (about this time) while I was in Thailand. |
A little music for this rainy (cold, windy and gross) Monday morning.
Sunday, April 22, 2012
Vegetarian Chili Stew
 |
| A bunch of beans and boiled veggies isn't really a pretty sight, so here's the bag of beans I bought instead :) |
What you need
12-oz bag of mixed beans (bought mine at Trader Joe's)
2 cloves garlic, minced
1 tbsp olive oil
1 small onion, diced
1 green pepper, diced
1 small yellow squash, diced
2 carrots, diced
1/2 cup corn (used frozen)
1/2 cup broccoli (used frozen)
1/2 cup cauliflower (used frozen)
1 package of vegetarian chrizro (from Trader Joe's)
2 cans diced or stewed tomatoes
salt and pepper1 tbsp Tapitio (or any other hot sauce)
1/2 can beer (I used Miller Light - we fancy 'round here)
What you do
1. Prepare the beans according to the package. I recommend soaking over night, I did the quick way and some of beans weren't all the way done.
2. In a large stock pot combine the garlic, oil and all the veggies. Let saute for five minutes.
3. Add the tomatoes (with juices), chrizro, 3/4 cup water and bring to a boil. Keep heat on medium heat for 20 minutes or so while the beans and veggies get tender.
4. Add your beer, hot sauce and salt and pepper. Bring back up to a boil for a few minutes and then simmer until the mixture is to your liking.
5. Serve with chips and sour cream (and more hot sauce, of course!).
Friday, April 20, 2012
Fred Huette Spring Herb Sale
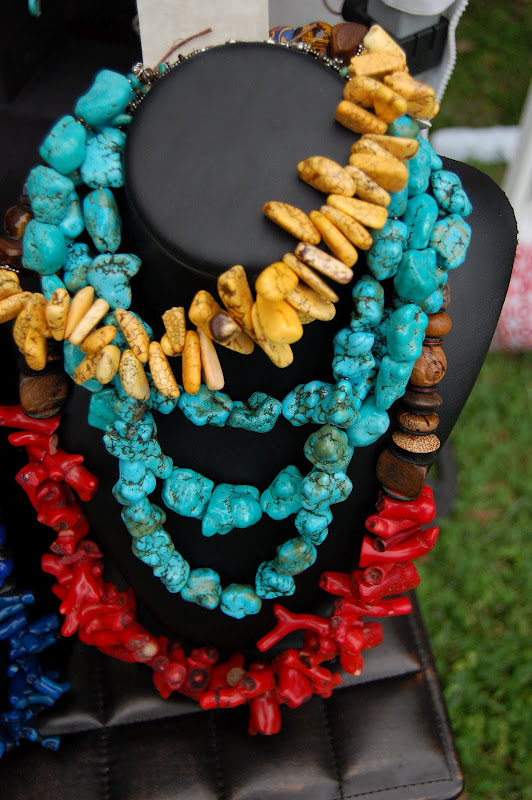 |
| Gorgeous necklaces I somehow resisted buying at the art show two years ago. |
You've probably never even heard of the Fred Huette Center – or the annual herb and art sale. I missed this art show last year since I was still in Ohio, but it's definitely worth stopping by. The historical center puts on a two-day herb sale and art show with loads of regional artisans. The art is very unique and since the cost to partake in the event is relatively cheap, the prices are very affordable.
 |
| Handmade mermaid from the art sale two years ago. |
The craft show runs Saturday 9 a.m. to 4 p.m. and Sunday 10 a.m. to 4 p.m. There are cooking demonstrations, the garden will be in bloom, lots of herbs for sale and more than 40 vendors selling their handmade crafts.
Conquer and Divide
 |
| That's my cereal bowl and tea cup from this morning, I'm not a slob, I promise! |
So it's Friday and the start to a very fantastic three weeks! Tomorrow is the long-awaited baby shower for Kelly Jo (pictures to come next week) and everything is coming together quite nicely. Wednesday we leave for our New Orleans trip (I'm bursting at the seams with excitement). Then, two days after we return, I'm going home to Ohio for 11 days to visit family and friends (September was the last time I was home).
First and foremost, I have to conquer this Friday. Picking up my veggies from the CSA is first, then tackling purging, cleaning and re-organizing this office (closet) is next. Why you ask? I just ordered a brand spanking new computer! 21.5" of Mac goodness is coming to Fairview Place next week, so I have to get ready for it. What's on the agenda for your Friday?
Thursday, April 19, 2012
Thrifty Thursday
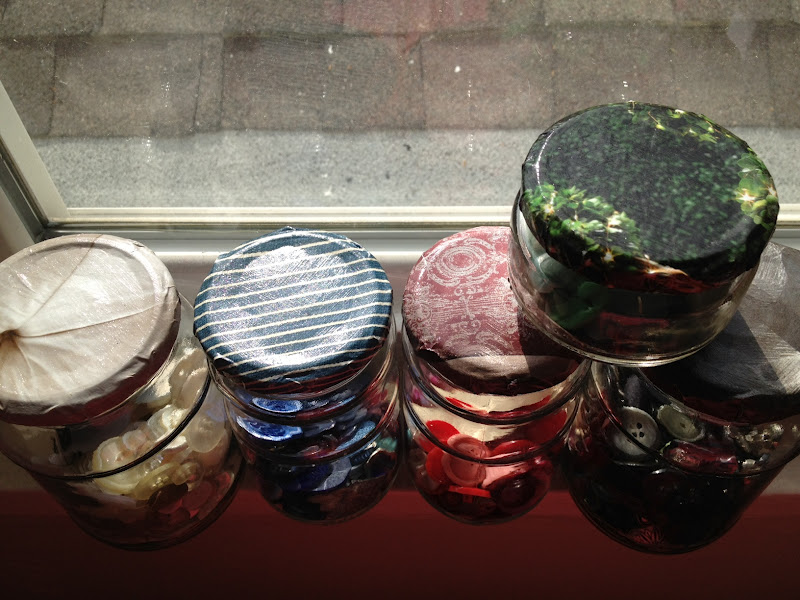
I decided that to make my button jewelry process easier, I needed to
have color coordinated jars for my buttons. You might think this is a
little excessive, and you're right. However, it took me about 15 seconds
to find a particular button the other day, where as it used to take me
months (yes, months) to locate the necessary item ;)
 |
| You'll notice fabric on the left, which I was originally going to use. However, after trying one or two lids, I realized they wouldn't close tight and resorted to magazines instead. |
The project can be made with any old jars and paper, the Mod Podge will cost you less than $5 at the craft store and the project will take you less than 40 minutes!
What you need:
5-7 jars, cleaned free of labels and glueMod Podge
Foam paint brush
Scissors
Magazines – Restoration Hardware came in handy for this!
What you do:
1. Cut your colored paper in circles measuring about 1" wider than the lids.2. With the foam brush, apply the Mod Podge to the wrong side of the circle (apply generously). Lay the lid in the center of the circle and fold the edges to the inside of the lid.
3. Apply another generous coat of Mod Podge to the top of the lid and sides. You can repeat this a couple of times for a more textured finish ( I put two coats on).

Send Something Good
 |
| that's me and my boy. |
I'm participating in another package project, this time it's Send Something Good. Today we're having a Link Party (my first) to give our secret pal an inside look on what we like and don't like. It also is a fun way to connect with lots of fun and interesting people in the same kind of circle.
Check out our lovely hosts' blogs:
Gentri's blog: http://gentrilee.blogspot.ca/
kaitlyn's blog: http://blog.isavirtue.net/
Kristy's blog: http://
Kristy's blog: http://
Without further delay, I've put together a top ten list of my favorite things. Honestly, I'm into just about everything but black olives and bugs, but here are my must-haves.
1. my fam
2. fabric & felt
3. hiking/traveling/adventuring
4. thrift stores
5. cooking (not baking though)
6. handmade or antique jewelry
7. taking photographs
8. the color teal
9. pickles and pretzels
10. tea
Wednesday, April 18, 2012
Baked Tomatoes

Yet another Pinterest-inspired recipe, which I tweaked a little according to my time and ingredient restriction. The healthy side dish came out awesome and I'm anxious to try this with other veggies like eggplant and zucchini.
What you need:
3-4 Roma tomatoes (any kind will do)1/2 cup balsamic vinegar
2-3 garlic cloves, minced
1 small bunch of kale, de-veined and chopped
1 cup shredded cheese, your choice
What you do:
1. Cut the tomatoes into 1/2" slices. Marinate in the vinegar for at least an hour (the longer the better).2. Transfer to an oiled cookie sheet and bake at 350 minutes for 8 minutes, or under very tender.
3. While the tomatoes are baking saute the kale and garlic until soft/wilted, about 5 minutes.
4. Layer the tomatoes with the kale and cheese and broil for a few minutes, you want the cheese to brown just a tad.
Tuesday, April 17, 2012
A First Time for Everything

About a month ago Kelly Jo asked me if I would do some maternity photos of her and Randy before the baby arrived. To be honest, I was a little nervous at first. What a huge privledge to document such a special time in their lives...and what a huge weight on my shoulders to get it just right! But, I'm always up for a challenge, so I agreed without hesitation and got to work researching pregnant lady photos (I'll admit, this was a first).

 |
| Most photographed steps in Freemason? Quite possibly... |
We were so lucky to have beautiful weather, upper 70s and a golden sunset. We spent about an hour walking around Freemason, posing in front of little spots I had scouted out. During our little shoot, a couple with their professional photographer walked by and I felt like the real deal for a hot minute, haha.
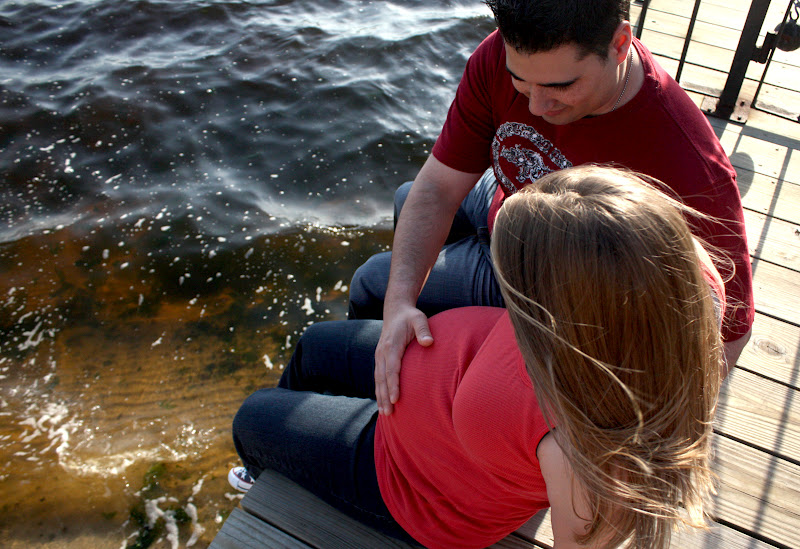 |
| Lucky for us, the tide was in! |
The best part of the whole evening was making some lovely photos of two amazing people. They were so much fun to photograph. Randy was an great sport and helped me get more comfortable with telling people how to pose. Plus, he had some great ideas of his own (above).
 |
| I just love this photo of her! |

I have to thank them both for letting my amateur skills help document their special time. Maybe by their next one I'll have a few more tricks up my sleeve ;)
Monday, April 16, 2012
Music Mondays
 |
| Library of Congress image |
I have a lot of images to start editing from my first-ever maternity shoot yesterday! Yep, you read that right. Went on a little pregnant photo journey with Kelly and Randy around Freemason. Photos to come later this week, until then, some photo-editing music.
Friday, April 13, 2012
New at Fairview Place
 |
| Click here to see the Color of Outfits book |
 |
| Click here to see the Forest Friends book. |
I'm also trying out a new type of book with no words at all. You can encourage your babes to create their own story, identify colors, count the number of stitches and more. The three new books, Forest Friends, Colors of Outfits and The Wild West are for sale only at Fairview Place.... What are you waiting for? Head over now!
 |
| Click here to see The Wild West book. |
Spring Bada-Bing!

So if you've absolutely fallen in love with Kitsch (like 99% of the population in Norfolk ;), you must check out the Spring Bada-Bing craft fair in Richmond this Sunday. It features many Kitsch-like artisans, with fun, funky and absolutely adorable arts and crafts. The shindig starts at 11 a.m. and ends at 5 p.m., so there's plenty of time for shopping. Unfortunately, I'll be missing this year's show, but I'm getting a chance to do my first maternity photo shoot!
Thursday, April 12, 2012
Thrift Thursdays Part 1


Wednesday, April 11, 2012
New at Kitsch

Dropped of my weekend creations at Kitsch yesterday, which should be available today! Trying out a new 'stacking' button earring idea... A good use of my mismatching buttons.

Also, some larger, more gaudy style earrings. Come to think of it, some way small dainty creations for the little kitschy girls as well. Hell, there is something for everyone, so just go check it out for yourself!
Tuesday, April 10, 2012
Taxes First-Timer
With less than 10 days to spare I finally got around to filing my taxes. Since this is the first time I've ever filed my own taxes (thanks Mom) and the first year I was self-employed, I really had no idea what to expect. I did know 2010 was the last year I'd ever get a tax return, and from now on I'd only be paying come April 15. I'm happy to report the whole process when rather smoothly and with all my deductions I'm under what I previously thought I'd be paying! So, in a nutshell, here's what I learned:
1) Keep all your receipts. This seems obviously, but really, it isn't. I had a bucket full of receipts and thought I was going overboard for sure. But in all reality, you can write it all (okay, within reason – you can't write off a new boat) off!
2) Keep a mileage journal in your car. I'm kicking myself for not keeping better calculations of all driving I've done for work in the past seven months. At first I was doing an excellent job (if I say so myself), but the errands to Michaels, Hancocks and a bazillion thrift stores never quite made the list. I've invested ($1) in a little notebook that sits in my driver side car door to keep track of all these miles. It will work!
3) File your taxes quarterly. I didn't quite rack in the dough last year, and I didn't officially start working for myself until May so this wasn't quite necessary for me. But there are (I'm positive) lots of things I could have written off that I just didn't remember, couldn't locate the receipt or wasn't completely sure would have mattered.
4) My desktop folder. There are lots of things I paid for online (Etsy bill, airfare, program fees, etc), but didn't always have the means to print the receipt. Instead, I kept a folder on my desktop labeled "Tax Write-offs" where I kept PDF files, screengrabs or JPGs of the bills. Saving the environment and making tax write-offs at the same time...winning!
5) Earned Income Tax Credit. Yes, you have to be kinda poor to be eligible for this. But if your adjusted gross income is less than 13,660, you will probably qualify. Even if you're not sure, check it out, you might be pleasantly surprised!
6) Depreciation. I'm working off my computer from 2008, yet I received a deduction for the lessening value of the machine (as well as my phone and camera) since they are used 100% for my business.
And last, but not least, keep all your receipts (see #1).
Roasted Red Pepper Dip

This is one of my favorite accident recipes... I was trying to make a goat cheese and roasted red pepper dip, but the lack of ingredients lead me to this concoction. Try it, you'll be pleasantly surprised!
What you need:
1 jar roasted red peppers5 oz low-fat (or fat free) cream cheese
1/2 cup feta
salt and pepper
What you do:
1. Drain the peppers.2. Put everything into a food processor and cream until your desired consistency.
3. Enjoy with pretzels, veggies or use it as a sandwich spread with some cheese, sprouts and tomatoes!
Monday, April 9, 2012
Music Modays
 |
| Library of Congress image |
My boyfriend leaves town and I spend the weekend watching Twilight (don't judge) and crafting.
I missed him, but the productivity levels were through the roof!
Here's some music to get your crafting on.
I missed him, but the productivity levels were through the roof!
Here's some music to get your crafting on.
Friday, April 6, 2012
Get Found Workbook


So, lesson learned? Don't ignore Etsy's emails. Well, at least not all of them. And, if you're just starting out your own small crafty business, definitely make this a must-do on your list!

Subscribe to:
Posts (Atom)