Showing posts with label refinish. Show all posts

Thursday, August 7, 2014

#79: Update Tea Cart


I bought this ol' gal at an estate sale earlier in the Spring. Yes, I overpaid at $20, but I felt like it was a wise investment as patio furniture or a future display for my felt flowers. For $2 in spray paint I gave the cart a few coats of white paint and used it as a drink cart at our last get together. I still plan on changing out the wheels, when I finally find the right size, but it's adorable and perfect for our little porch landing!


I also love the assortment of goods on this cart: Straws from Ikea that Emily and I hoarded about 5 years ago. The flower tin tray is from my Thailand trip. The bar set was a housewarming present from Emily. Handmade felt flowers. The wood slab will be part of our wedding centerpieces. And of course, Smartmouth!

I'm participating in the 92 Days of Summer challenge. Click here to read all about it and here to a see a gallery of pictures of everyone participating. 

Monday, December 30, 2013

Favorite Projects of 2013

It's been a great crafty year! I wanted to highlight some of my favorites from 2013, in no particular order :)


Bringing back the Felt Brooches, in all seasons. They were a huge hit with the customers this year and I have so much fun making them!


Norfolk's first Better Block, held in April. I met my good friend John Wharton and his wife Patricia - along with tons of other amazing people in the arts community. We opened our first Pop Up Shop and had a fantastic weekend running the show.


Thomas' Smash the Cake session in June. It really tested me as a(n amateur) photographer, working with babies isn't easy...but it's fun!


A year of felt food, which included nachos, donuts, salads, pita sandwiches, caramel apples, mini cupcakes, cheese wheels, blueberries and a custom-made horse food set. The horse set was my favorite, by far!


Another successful 92 Days of Summer...is it bad I'm already planning for 2014?


My felt flowers have been a long time coming and while they are still taking a while to become a big seller, I think 2014 has much more in store. 


Custom-designed wedding invitations a very awesome couple.


Refinished China hutch, a nice thrifty before and after. 


A second opportunity with Better Block, this time strictly on the design and marketing side of things. 

Thursday, August 29, 2013

Thrifty Thursday: Before & After


We bought this buffet and hutch for $100 from one of Mike's Dad's contractors with the idea that we'd refinish it or sell it and make a few bucks. When Barney dropped the piece off it was in need of a little TLC, so we cleaned it up with some Old English the previous homeowners left us. Surprisingly, it looked really nice! However, it still didn't match our brand new table that looks almost identical to this one from World Market.


I listed the piece on Craigslist and it sat for about three weeks. Since our housewarming party was nearing and I didn't want this unmatching piece hogging the spotlight I got to work on researching techniques for "refinishing cherry wood to look like world market table." You can imagine how many search results I found: exactly Zero. After talking to a Home Depot employee (who didn't actually roll their eyes at this project), I decided I would have to make up my own technique. I bought black paint, black varnish and a pack of plastic gloves for $10.


We removed all the hardware and wiped down the cabinets. Then Mike got to work "distressing" the wood by take a hammer to it. We decided that using all the different edges worked best to give it the super textured look. Next, I took the electric sander and went light over the entire surface and much harder in only a few areas for that weathered look. Using a damp cloth, wipe the surface completely clean.


Instead of a "white wash" that I'm sure you've heard of, I made a "black wash." It consisted of 1 part flat black paint to two parts water. I gave it a stir and painted it on. Oh, and this would be the point you need to put on your gloves.


Because you're going to take a rag and wipe all the paint off. You want to make sure the black wash has covered all the surfaces, but don't be too worried if it looks too dark at first. I left the wash on anywhere between 5 and 10 minutes. I tried to work fast, but with the bottom it was harder to get through all the sides quickly. Just make sure the paint doesn't dry before you can wipe it off.

Here is the hutch after hours of hammering it. I'm glad this was Mike's task!


Once your black wash is completely dry, open up your can of black varnish. I cannot stress enough to make sure both hands are gloved! Take a dry rag and dip into the varnish, wipe on the wood with the grain. You're almost going to massage the varnish into the wood, I'll warn you, this is the tricky part. You don't want to use too much varnish because it'll be sticky as it dries and smudgie (trust me, I learned this the hard way). Just use a little as you go and be sure to wipe away any excess. We experimented with the drawers one day and let them dry over night, I tweaked the process from that - if you have the time, try it that way.


Grandma's mash potato dish, Great-Grandma's fondue dish, Haviland Wedding China
passed down through generations, a house warming gift, a graduation gift,
a Moroccan treasure and a gift from a strange. Everything has a story, everything has a place in my heart.

As you can see, the final product turned out pretty close to our table. The piece fits in the room much better and while we may not have it forever, I'm certainly happy with our $110 project!

Make sure you have these essentials!
Cotton rags or your boyfriend's old undershirts (lots of them)
Several pairs of rubber gloves
Electric hand sander
sandpaper
flat black paint
black varnish
a tarp or drop cloths
paint brushes
jar with lid (to mix the paint and keep overnight)


I am happy to use this as my "No. 27 Freebie." I'm participating in the 92 Days of Summer challenge. To learn more about it, click here.

Wednesday, July 31, 2013

Self Portrait: July


Here I am. In motion. I get home from work, throw on some work clothes, haul out all the tools and get to work. This is how July has been (and June too, for that matter). Rushing through one job, just to move onto another. Some days I feel if I read another DIY blog or make another trip to Home Depot to have one of their employees say "You wanna do what...?" I may just explode. But, I wake up bright and early the next morning to log online and see the best approach for my next project.

I can't really complain at all. Mike and I have learned so much. We have done yard work, bug work, plumbing work, rearrange work and electrical work. He has become the master picture hanger. I have become a refinishing guru (kinda). The current project (above) is our biggest to date we're tackling together. We're refinishing an old buffet and china hutch to exactly match the new table (that looks old) we bought last month. Through a team effort, we're working our way through it. Stay tuned until next week when we reveal the finished product!

Thursday, May 23, 2013

Before & After: Tea Cart


Would you believe I found this vintage tea cart at an estate sale for $6? It was originally $12, but Sundays are always half off - my lucky day! It doesn't look too bad here, but was actually rusted pretty bad, so it couldn't stay as is. 


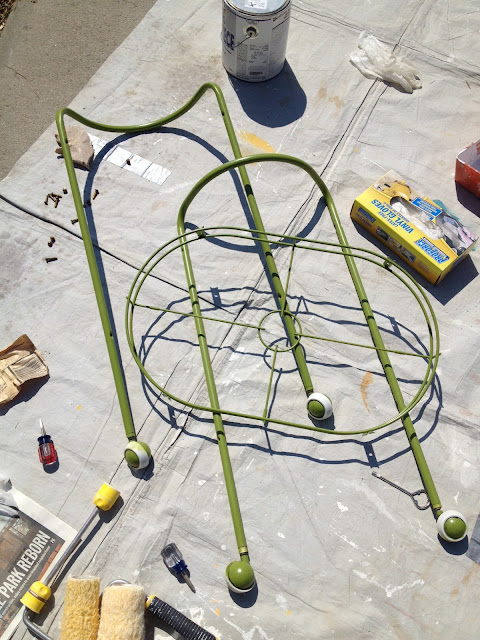
I decided I wanted to do a really bright, loud color. My friend suggested coral, which I thought would be so pretty. However, the full can of green spray paint I bought several months ago to refinish jewelry boxes (like these) was sitting in my closet screaming to be used.


I unassembled the cart easily since it was missed three of the eight screws that held it together. With heavy grit sandpaper I gave all the parts a 15-minute sand job, then wiped clean with a towel. I taped up the white rollers on the feet and gave the entire cart two heavy coats of paint. 


Since it was a gorgeous day outside the whole thing was dry within an hour. I reassembled, added the glass back on top and voila! You might remember this below from Better Block. It was one of our centerpieces when you walked in the shop. I am so happy with the way it came out, it'll be perfect for serving drinks on the patio one day... or maybe a plant holder in the garden.